UT-Trainer — Ultrasonic Testing Simulator
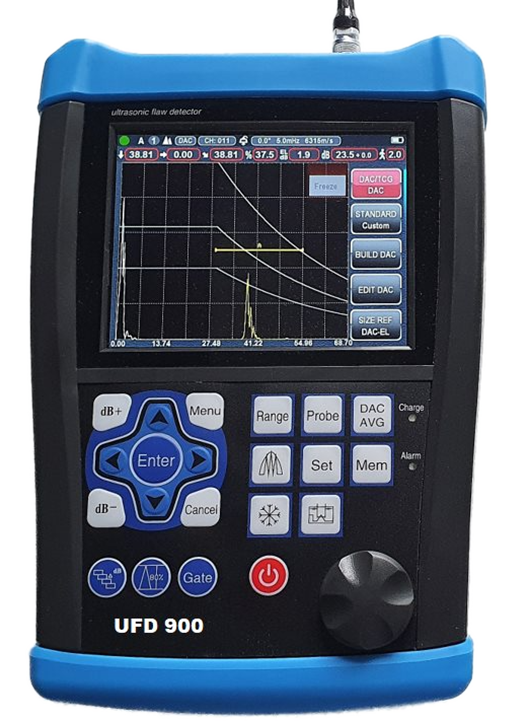
Real device photo with interactive controls — the same UFD 900 used in the courses. Test block: unknown material, 30 mm thick, measured manually with a caliper — find its sound velocity ultrasonically to identify the material.
Reference
Scan conditions
Test specimen
Position: 150 mm
Single-element straight-beam probe.
Drag the probe along the plate's surface. Click it to lift it off (line goes flat) or place it back down (coupled).
Live readout
How to use
Press Power first. The 5 tiles on the right of the display are real
menus, exactly like the original device: Range, Probe,
Gate, Set and Mem jump straight into their own menu
(BASE/PROBE/GATE/SET/MEM), DAC/AVG cycles DAC → AVG → off. The
Menu key (between dB+ and ▲) opens the real 13-icon grid — move
the cursor with the D-pad, Enter loads a group,
Cancel closes it without changing anything; groups this
trainer can't simulate (Toolkit/VIDEO/BSCAN) are shown dimmed.
Inside a menu, tapping a tile selects it (pink outline) or fires the
action, and ▲/▼ step through a menu's own functions, scrolling if it
has more than 5. Change a value with the rotary encoder (click
left/right or scroll wheel) or the ◀/▶ arrows. dB+/dB− change
gain directly, even outside the GAIN menu. The round key with the
zigzag icon is AutoGain. The second square icon is Zoom.
Freeze shows "Freeze" on screen. On the test specimen to the
right, drag the probe along the plate's surface or click it to lift it
off / place it back down — without coupling the trace stays flat. A
hidden flaw sits somewhere along the plate: scan slowly and watch for
an extra echo ahead of the first backwall signal — like a real
near-surface reflector, it rings its own repeat-echo train too
(fading faster than the backwall's), so don't mistake those for
deeper flaws.
Menus (from the original manual)
BASE (Range): RANGE/VELOCITY/D-DELAY/SCALE/THICKNESS —
D-DELAY is a scan-level timebase offset the operator dials in
(e.g. a known immersion water path), separate from the probe itself.
Right-click VELOCITY to flip straight between the material's
longitudinal and transverse velocity (steel: 5920 ↔ 3250 m/s) instead
of dialling the whole way.
PROBE (Probe, scrolls): TYPE/ANGLE/P-DELAY/X_VALUE/X_FREQ/
X_GRÖSSE/DÄMPFUNG/CAL PROBE/Name — P-DELAY and X_FREQ are that probe's own fixed, factory
specs (transit-time delay through its wear plate/wedge, and its
build frequency) — both jump to a new default whenever TYPE changes
(P-DELAY 2.62/3.00/5.00 µs, X_FREQ 5.00/5.00/4.00 MHz for SE/TR/
Angle), exactly like swapping to a physically different probe.
A P-DELAY that doesn't match the probe's real delay shifts every
reading — CAL PROBE (or adjusting it by hand) finds the probe's real
value. DÄMPFUNG switches the damping resistor between the
manual's four values — the echo is tallest at 400 Ω,
loses 5 % at 150 Ω, drops to 75 % at 100 Ω and
to just 26 % at 50 Ω, so stepping through them and keeping
the highest amplitude is a real search.
CAL PROBE is the manual's semi-automatic calibration: key in
the two thicknesses T1/T2, peak each backwall echo in Gate A, and
the device calculates VELOCITY and P-DELAY. P/R (Menu grid only): ENERGY/P WIDTH/PRF/
RECTIFY/REJECT — RECTIFY switches full-wave, half-wave and true
RF (RF is skipped while a DAC/AVG curve is shown, per the
manual). GAIN (Menu grid only): GAIN/STEP/SCAN/dB CORR/AUTO
GAIN. GATE: GATE SEL only picks which gate (A or an
independent Gate B, cyan) the rest of the menu edits — it does
not switch it on. LOGIC turns whichever gate is selected
POS (on) or OFF (invisible, no reading, no alarm — same
as the real UFD900's GATE/LOGIK function) — then START/WIDTH/HEIGHT/
ALARM (Gate A locked to POS, Gate B POS/NEG), DETECTION (PEAK =
always the highest echo in the gate, distance and height, even
below the threshold — which then only sets the alarm; shown as a
large triangle overlapping a smaller one; FLANK = gate-crossing
point, one triangle) and INDICATION (SINGLE, or DUAL = distance Gate B − Gate A). DAC (DAC/AVG key): DAC/TCG →
gate a backwall echo (BWE1/BWE2/...), save with ▲ (not Enter!),
repeat, Enter finishes. STANDARD/Custom overlays a second
line (−6 dB), BUILD DAC saves like ▲, EDIT DAC removes the last
point. AVG (DAC/AVG key): the same recording flow for a DGS-style
reference curve (AVG/AVG AUFN/EDIT AVG/AVG_UL/AVG_ML), drawn in teal.
SET (Set key): SET NO. dials in a channel number 1–50 with
◀/▶ or the knob (like any numeric field) — Enter opens
the FILE LIST, a table of all 50 channels; picking one applies it
straight to the live instrument, so the A-scan updates immediately
(matches the manual's own SET NO. + Enter behaviour, 4.32 — there
is no separate RECALL function). SAVE first asks what inspection
the setup is for and files it under that description plus its own
number — type "V2 Test" on channel 2 and the file is called
V2 Test - Set No.2; leave the box empty and it is just "Set
No.2". RENAME changes that description later. The save itself is
immediate (toast: "Saved to #N") and separately offers the
file as a downloadable .json: watch for a save prompt from the app
around the trainer and confirm it — until you do, the file only
lives in the trainer, not on your computer (browsers can't write
straight to a folder on the Desktop on their own, so that prompt is
the only way a copy reaches your PC; pick "UT-Trainer" on the
Desktop once and most browsers remember that folder after). Saving
over an already-occupied channel asks for confirmation first, same
as DELETE/DEL ALL.
MEM (Mem key, scrolls): REPORT dials in a report number
1–100 the same way — Enter opens its own FILE LIST,
sorted by name or date (toggle with ORDER). A report is proof a
specific inspection was carried out — SAVE logs the whole setup and
result there (not just the reading), asks for its description the
same way (V2 Test - Report No.8) and downloads it like a
SET, also confirming before it overwrites an existing report.
Opening one from the list also applies its exact settings to the
live instrument and shows every setting, the result and the A-scan
as it was when saved, just like the manual's BERICHT function —
Cancel leaves that picture on screen rather than reverting it. A
report itself is never overwritten by this: it stays in the log
exactly as saved. To actually repeat that inspection, save it as a
SET afterward — that's what gives you a reusable, nameable channel
for next time; the next SET SAVE (from there or anywhere else) is
what replaces whatever's on screen. RENAME/DELETE/DEL ALL manage
the log. Right-click the Mem key (or "Report — large view / PDF"
under Reference) for a large, readable report that can be saved as
a PDF — this trainer's stand-in for the manual's report EXPORT.
SET/REPORT entries also save automatically to this artifact's own
storage (when that's available), so they survive a reload without
any manual action — the .json download on SAVE is still there too,
for a backup copy on your own machine (there's no way to load that
file back in — the manual's IMPORT isn't modelled here).
Material calibration (Probe)
Picking a material here dials MATVEL to its reference velocity, same as typing it in on the real device. Every test specimen is steel (5920 m/s) except the DAC Block (aluminium, 6320 m/s — no mystery, it’s labeled on the block) and the Unknown Material block, whose real velocity is deliberately hidden — its known 30 mm thickness only reads correctly once MATVEL is right. Wrong MATVEL = wrong depth reading everywhere, just like on the real device.